
How high should a stair handrail be installed?
Determine the fixing height of a stair railing
Before starting the installation of a wall stair railing, the first thing to check are the measurements.
The ideal height
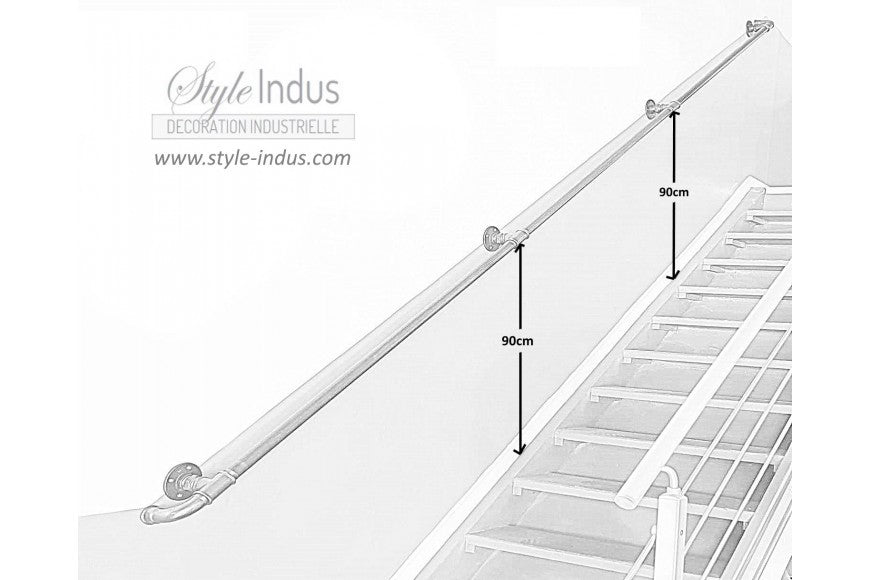
The height of the handrail when it is not integrated into the stair railing must be at a ideal height of 90cm high vertically from the stair nosing. A margin of about 10cm is tolerated of course, the installation of the stair railing can be done a little lower at about 80cm from the stair nosing or also a little higher at a maximum height of 100cm.
Regarding the hand passage between the wall and the railing, the common space is between 5cm and 8cm, this gap is perfect in the vast majority of indoor handrail uses, whether your staircase is straight or in spiral.

Now that we have the dimensions, let's get down to business, starting with calculating the length of your stair railing. It's actually quite a simple step, so here's some easy-to-remember advice.
How long should my wall stair railing be?
Simple answer, the length must correspond to the size of the staircase, ie if your staircase is 3m50 long, your railing must also measure 3m50. Each end of the ramp must come up to the level of the first and last step, as shown in the diagram at the top of this page. Of course, depending on the configuration of the room or hallway and depending on the model of your handrail, you can extend your handrail by a few extra centimeters.
A little further below the image we list the 4 steps to best install your stair handrail, in particular the curved model sold on our site available for sale in 36 different versions.
For information, the ramp kit is available in 2 diameters to choose from (26x34 - 3.4cm) or (33x42 - 4.2cm) and this in different lengths indicated by the letters A and B that can be found on the 2nd image of the product sheet like this one below, with according to the desired length 1, 2, 3 or 4 fixing points. Here in our example the diameter used is 1" (26x34).

Let's move on to the stair railing installation example:
Prepare the threaded pipes of the seamless handrail
First, we will properly clean the black steel threaded pipes of the ramp using a cloth for example and degreaser or white spirit, this also works. We point out that the black cast iron fittings (90MFGR tees and elbows) are already clean from the start, so there is no need to degrease them. Once this operation is complete, let's move on to varnishing to protect the steel pipes and cast iron fittings against oxidation and rust. It is important not to skip this step, use transparent varnish (colorless) for metal in order to protect your railing well. Invisible universal spray varnish can also do the trick very well. Once the varnish step is complete, let it dry for several hours.

Assemble the stair wall handrail kit
The pipes and fittings are ready, now we will proceed to the complete assembly of the handrail. Once all the parts of the kit are assembled, we can move on to marking the holes in order to drill the wall.


Marking the location of the ramp on the wall
Now that all the parts are assembled, bring one or two people along and position the railing against the wall at the standard height as indicated at the top of this article, ie 90cm from the stair nosing. Be careful to keep the ramp parallel to the steps, once it is in place, take your pen or marker and mark all the holes to be drilled. Next, let's put the handrail back, the holes are marked, it remains only to drill. Do not hesitate, a forest of 7 or 8 will be perfect to fix the ramp. This must be firmly fixed to the wall of course, the weight of a seamless steel stair railing is not to be taken lightly, depending on the length it can reach up to 19kg.

Fix the handrail on the wall
The assembly of the handrail is coming to an end, it's the moment of truth. Reposition it against the wall and start fixing the two ends without blocking the screws, then also tighten the fixings in the center if there are any. In all cases, depending on the configuration of the stair railing, it may be useful to play on the tightening or loosening of the nipples at the level of the fixings, in order to allow the flanges to stick well against the wall (see image below). below). Once the ramp is flat against the wall, all you have to do is block the tightening of the screws and you're done. Your industrial style stair handrail is installed.
PLEASE NOTE: In diameter 33x42, the elbows at the ends cannot be pressed against the wall, they are positioned parallel to the wall or at 45°.
